IR (night vision) spotter build

I’ve been toying with an idea of building a night vision spotter for a while, however I had a few hurdles along the way and it wasn’t really a pressing matter. I’ve accumulated enough components to build one and finally could design and print a torch mount…

…but first, in memory of my (at least) 21 year old Tandy Electronics soldering iron, that died in the making of this thing. Rest in peace little fella, you served me well for over 2 decades.

Today, new soldering iron arrived and I thought, I’ll finish this off as much as I can. I still need to open it and secure some wires. Hot glue gun is ordered, but in the meantime, there is really nothing stopping me from giving it a crack, other than rattling connectors and wires inside.

Nothing too complex, but definitely fun.

First build/prototype
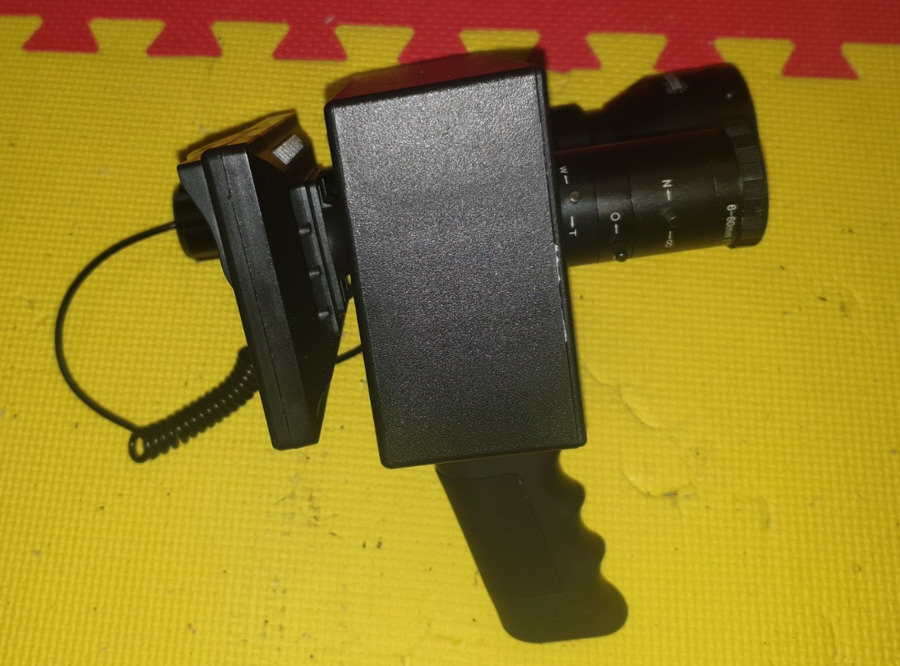
Photos


Video

You will notice that this particular one has a pressure sensor on IR torch and separate battery pack. That’s intentional. I wanted to see how everything goes before I make this about half the size with everything integrated into single box. For now, this is pretty sweet.

Total cost: under $120*

Caveat, didn’t really set out to build it on the cheap, rather build proof of concept. However it is still hundreds of dollars cheaper than what’s available. In this case, I am using a much better lens too, so it is a better build and the most powerful IR torch I could find for it (I have a different plan for it, this is a trial). I also didn’t factor in reasonably pricy 12V battery pack (I have a couple), I use them with other projects/for everything, so not really applicable.

Next version of the build will have weaker IR torch (aligned with lens capability), however 2 instead of one, in fact I will just need heads, not bodies; and integrated 18650 batteries. This will get the entire project to sub $70.

Q&A
Q: JS, you are so awesome, is it hard being so awesome?
A: yes, it’s a daily struggle.

Q: Why is torch mount in grey and not black?
A: Because you don’t question greatness! That’s why. Also, I am lazy and couldn’t be bothered walking to garage to change printer filament.

1 Like

Looks cool, will be interesting to see how it goes in the bush.

Though you did miss 1 question in your Q&A

No, @1Fatman, I think you missed a part of Q&A.

Hope that answers your concern.

This is version 2 for you on a IR build isint ? I was pretty impressed with your first version hope you share the details on stuff like the camera and lenses that you are using.

No, this is V1, @sungazer. I may have shared something a while ago, but that was just a rat’s nest of wires before I got everything packaged up into what you see above.

Will share, but essentially at the core it’s a lens - any lens, sitting on a c-mount, in front of a camera ( again, any camera), with IR filter removed. Removing an IR filter on the sensor is the hardest part. Rest is what you see, a handle, some switches and an IR torch.

This is actually in part my target camera, cannibalised…

But once I am happy with it, will share.

1 Like

:thinking: that moment when you realise you’re the dumbest person in the room…

Hardly, mate. I’ve seen your ecosystems with fishes and mermaids. :stuck_out_tongue:

Just did a quick google search at work, some of the compact digital cameras are surprisingly easy to modify to IR.
Going to have a look at my collection of old cameras and have a play with some…

1 Like

Yep, key is the filter that’s often epoxied on and needs a soldering iron for a bit of persuasion. Be careful not to damage the sensor.

I don’t mind if I bugger up one or two. I have a lot of surplus digital cameras.

There are quite a few YouTube vids and web articles on building IR spotters and scope mounts. Very popular with British airgunners who have put in the hard yards on prototypes to provide great info on best cameras to use etc.
Looks very good JS, nice and neat and compact, I like it.

Spot on, took me a while, reading through UK night vision FB group to understand everything. And then 2 FPV cameras that ended up having a hole where camera sensor used to be - that’s me trying to get the IR filter off. Not as easy as people make it look, At the end ended-up heating it up with soldering iron and trying to take it off (with force) using needle nose pliers.

Personally, I don’t like it, but I am my own worst critic LOL I think I can make it at least x2 smaller. And I have a spare (in fact I have 2 spare) old cannon lens that I am going to use in V2 instead of what I have now. Just need to find the right C or CS mount (or whatever they are called) for it. then, I’ll be happy.

Plan is to integrate everything inside. Anyhow, that’s it for now, I wanted to build one. I built one. Sweet, on to the next project, until I get around to cannibalising it and finding the right lens mount.

Little Mr wanted to see what “night vision” is, so I reassembled my spotter, which I cannibalised for parts earlier. I think this gave me a little nudge to finish it…

Wondering if anyone else here built or builds them?

Anyway, @sungazer I remember you were asking about details and I once again forgot to take a pic of the guts, but I scavenged other components I had around and took them apart, so hopefully everything below will answer most if not all question.

Camera module:

I have a few, so this is pretty typical:

One needs to swap the lens and lens housing for a c-mount and a new lens. But before that, you’d need to remove the IR filter from the sensor. This is the fiddly part.


mount screws

cam-1-3
sensor only

cam-1-4
sensor only

cam-1-3 line

Note the piece of glass on top of the sensor, this is the IR filter.

Another camera I pulled apart (just for you!) - similar after you remove the PCB and lens housing:

cam-2-1 line
note the red line, that’s the filter

Removing the filter is not for the faint of heart. It’s stuck on there pretty tight. Requires a bit of convincing to come off with a soldering iron, to soften the glue or epoxy or whatever is used to stick it on there.

After that’s done, you would swap the lens housing for c-mount or c-mount and correct adapter for your lens.
cmount-1

cmount-2

That’s about it. that’s the hardest bit.

After that, screw in the lens:

…and connect power, video, IR, some switches and project housing. That’s about it.

@bentaz I’ll keep it assembled for next time you want to have a fondle :stuck_out_tongue:

You need to bring it out here (plague willing) so we can ping so bunnys

1 Like